Sunday, January 31, 2010

Cranberry and White Chocolate Cookies (ie – bits of tasty heaven)

So after the onslaught of cookies that the holiday season brought to my house I finally had the craving for something sweet again. I was browsing one of my favorite food sites the other day (www.seriouseats.com) and this recipe just about jumped out and kicked me in the face. I immediately started drooling and knew I had to make these cookies. I was not disappointed. These tasties come from the cook book Nigella Christmas by Nigella Lawson.


To make this little bit of toe curling heaven you need:

1c All Purpose Flour

½ tsp Baking Powder

½ tsp Salt

1c Quick Cooking Oats

1 stick Butter

½ c packed Brown Sugar

½ c Sugar

1 Egg

½ tsp Vanilla Extract

½ c Dried Cranberries

½ c Chopped Peacans

¾ c White Chocolate Chips

Preheat your oven to 350 degrees. Put your flour, baking powder, salt, and your oats into a small bowl. In a big bowl put your butter (softened) and your two sugars. Mix until creamy with your hand mixer. Then add in your egg and vanilla.

Next beat in your flour mixture. Once thats good and mixed add in (stir by hand) your cranberries, pecans, and white chocolate chips.

Take a tablespoon on dough, roll by hand and place on your cookie sheet. Then take a fork and squish the balls of dough down a bit. Bake for 15 minutes. They are done when gold on the edges (mine took only 13 minutes not the full 15). Let them cool for a moment on the cookie sheet before moving to your cooling rack. Let cool a bit then eat and be delighted!

Saturday, January 30, 2010

Green Bean Pesto...

Or "How to Get Rid of Produce"

I had some slightly sad green beans (off-season...what did I expect), some slightly sad cilantro, and a slightly sad lemon. What to do...


Ingredients:
1 quart green beans, washed and snapped
3-4 cloves of garlic, coarsely chopped
1/2 cup cilantro, coarsely chopped
2 tbsp olive oil
Juice of 1 lemon
1/4 cup walnuts
1/4 cup yogurt (or sour cream, or ricotta, or some other tasty dairy product)
1/4 cup parmesan cheese
1 tsp black pepper
1/2 tsp salt
dash ginger
1 lb pasta
2 bullion cubes

Put the water on for your pasta with the bullion cubes. Over medium heat, saute garlic and cilantro in olive oil with the salt and pepper. Typically I wouldn't cook the cilantro, but in this case I had to cook out the sad.


Add the green beans and cook until they have turned a darker green and are a nice al dente. I am fairly sure that overcooking would lead to a kind of icky pesto. Allow them to cool a little bit before you stick them in your food processor/blender/what have you. By this time, your water should be bubbling away; cook the pasta al dente.


Pulse the green beans and other remaining ingredients until the mixture reaches the consistency of coarse polenta/grits (depending on how Italian/Southern you are!)


Add about 1/3 of a cup of the pasta water and a dash of ginger and whirl again to combine. Stir it into the pasta and serve with a handful of parmesan or a dollop of yogurt. So very tasty!


Sunday, January 24, 2010

a dorm-room classic, but better!

I learned from my mother to create menus for each week before I go shopping; it saves you money and never leaves you sitting in the car on your way home "what the crap am I going to make for dinner!?" When I'm having menu-writer's-block I turn to my very small collection of cookbooks for inspiration.
One of my favorite cookbooks EVAR is The Japanese Kitchen by Hiroko Shimbo. She's basically the Julia Child of Japanese cuisine. Out of 250 recipes, none that I have tried has been bad. I love her so. The book is full of helpful illustrations, because some of the techniques are not used by your typical American home cook. And (thankfully) there isn't a single glossy photo. Those dang glossy cookbooks seem to fall apart if you breathe on them too hard.
ANYWAY, I was flipping through the Shimbo book and found a recipe for ramen broth, which I immediately knew I had to try. I have altered it a little (my love doesn't eat pork), but the recipe is essentially the same.
For those of you who love Vietnamese food (hi, Mommy!), this broth is quite similar to the broth used for Pho.

Ingredients:

2 lb beef soup bones (found in the frozen meat section of the grocery store, conveniently in a 2 lb bag) or pork knuckle bones, cracked by the butcher
2 lb chicken thighs, with all the skin and bones and whatnot
1 small onion, quartered
1/2 head of garlic, cut across the cloves to expose all of their deliciousness
the green part of a leek (RINSE WELL)
1 oz ginger, an inch or two square (depending on how much you like ginger), sliced, with skin
10 oz chukasoba a.k.a "Japanese curly noodles" or a couple ramen packages without the powder.

Put the meat bits into a large pot and cover with cold water. Bring to a hard boil and cook for one minute.


Lots of yucky stuff will float to the top, but we'll throw that away. Drain the meat and rinse off all the aforementioned yuck.

This is the yuck.

*Aside: if you are squeamish about raw meat, this may not be the recipe for you. When I was knuckle deep in bone marrow while rinsing the beef bones when I realized something. After months of working up the guts (no pun intended) to work with meat, my squeamishness has been cured. End aside*

Return to the pot or stick in your trusty slow cooker with all the aromatics. Simmer on low (high in the slow cooker) for seven hours. You heard me. This is another recipe for people with patience (i.e. people who are not me)

These are the tasty bits

Boil up your chukasoba according to the package directions, and rinse well with cold water until they are no longer starchy and slimy. Divide into bowls, pour over as much broth as you want, and garnish with anything you want. A little scrambled egg, some meat, or cold vegetables would be great. I went for fresh cilantro with some water chestnuts. Oh, lordy, how I love water chestnuts. I found it also needed a little tamari or soy sauce for extra salt and flavor.


Friday, January 22, 2010

Good Noms gets cheesy

It's my birthday this week, and I made myself a cake. It's a really simple recipe.
Cheesecake:
Crust-
  • Graham crackers (one of the three individually wrapped packages in a box)
  • Butter - 1/2 stick
Cake-
  • Cream cheese - 3 packages
  • Egg - 1
  • Sweetened condensed milk - 1 can
  • Vanilla
Blend the graham crackers in a blender or a food processor. Alternately, crush them in a plastic bag. Melt half the stick of butter and mix it with the graham crumbs. Press into the bottom of a round springform or pie pan.

Blend the softened cream cheese with the can of milk. Do this before you add the egg, otherwise the cream cheese will clump and become coated in the egg and you will have trouble blending a homogeneous mixture. Add the egg and a teaspoon of vanilla extract.
Bake at 375 degrees for about 45 minutes, checking after about 40. The cake will become firm, the center will be almost set. Let cool almost completely, then refrigerate for several hours, for best results overnight.

Tuesday, January 19, 2010

Barley Risotto!

I am on what my man calls a "health bender", due to an alarming doctor's appointment in which my weight was revealed as, shall we say, less than ideal. And by less than ideal, I mean that I have become a fatty. So today's recipe is a lovely HEALTHY recipe, one (surprisingly) without butter.

If you have never had barley, you're really missing out! It's so chewy and lovely, and this recipe is full of lemon zest for a nice summery flavor in icky January.


Ingredients:

2 cups pearled barley
4 cups chicken broth (please use low-sodium if you get store-bought)
1/4 cup dry sherry or a little shy of 1 cup dry white wine
juice and zest of 2 lemons
1/8 tsp each of ginger and black pepper
1 tsp each of dried parsley and chives
1 tsp sea salt
3 tbsp olive oil
1/2 a large onion, chopped
2 cloves garlic, minced
1/2 cup sour cream
1/2 cup parmesan
walnuts for garnish
water

Step 1: Heat the oil in a large pan on medium heat. Saute the onion, garlic, and lemon zest until the onion is on its way to getting soft.


Step 2: Add in the barley and stir constantly for a few minutes. Then put your sherry in a measuring 1 cup measure. Add the lemon juice, and top off with water. If you are using wine, put the lemon juice in the measure and top off with wine. Add this to the barley and stir occasionally until the liquid is almost completely absorbed. This is the part of the process that smells the most delicious!

I wish you could smell this through the screen, because it is AMAZING

Step 3: Now, add one cup of broth, and allow to absorb before adding another cup, and so on. Then add two cups of water in the same fashion. The barley will be plump and chewy; if not, add a little more water and see how it feels.

Step 4: Remove from heat, stir in the dairy, and serve, garnished with nuts.

Monday, January 18, 2010

How to completely suck...

Put dinner in the Crock-Pot, leave town, and come back three and a half hours later so hungry that you forget to take a picture of it before you begin devouring it.
Another day this week, I suppose.

Sunday, January 17, 2010

Turkey and Veggi Soup

Here in the frozen area of Upstate New York it's the season for soup! Today I will share with you one of my new favorites. Every time I make this soup it comes out a little different. This is because I am always changing up whats in it depending on what I have around and what looks good to me when I am at the store. Feel free to change this one up as you see fit or to make a smaller or larger batch depending on who you are having over for dinner. I give you Turkey and Veggie Soup!
250g bacon (or smoked pork product) - diced
2 medium onions - diced
3 carrots - diced
2 celery stalks - diced
4 turkey thighs – bite size pieces
4 cloves of garlic - crushed
4 cups turkey stock
400g crushed tomatoes
2 zucchinis - diced
400g (1 can) cannellini beans
2 handfuls baby spinach - chopped
1 handful napa cabbage – chopped
1 container small mushrooms (portabella, or baby brown)
parsley or basil (your choice), salt and pepper

Start off by putting a little olive oil in your pot and cooking the bacon for a few minutes. Then add your onions, carrots, and celery and sauté for about 10 minutes until the veggis have cooked a bit.
Next add your turkey and garlic and sauté until the turkey is cooked. Once this is done you can add a cup of white wine to deglaze the pan and simmer to reduce. I did not have any on hand this time to I omitted this from the ingredients above.
Now add your turkey stock. If you are like me you have a metric ton of the stuff left over from what you made during thanksgiving waiting to be used in your freezer. If not then just go buy some! I recommend getting the low or no sodium kind so you can season to your own taste. Along with the turkey stock add the tomatoes. Give it a stir and bring it to a boil. Simmer for 10 minutes.
Now add in your spinach, cabbage, mushrooms, beans, and zucchini. Then season to taste with herbs, salt and pepper. Simmer for about 10 more minutes.
I suggest serving this with a small pasta such as orzo. You can cook the pasta right in the soup if you wish but I suggest cooking separate and then adding it in. This is a fantastic hardy soup that just begs to be changed every time you make it. Also if you end up with too much left over this freezes really well. Simply heat in a pan on low! Helps take the chill of those bones on any chilly night!
Yes, this is what I look like when I cook on a Sunday!

Saturday, January 16, 2010

Good Noms makes curry

Anyone that knows me well, will tell you that there are few things I love as much as a bowl of hot, yellow curry over rice. Very few things, indeed.

Yellow curry:
  • Carrots - 2 large
  • Red potatoes - 3
  • Sweet potato - 1 (Not a yam)
  • Onion - 1
  • Lemongrass - 1 stalk
  • Green onion - 1
  • Chicken thighs, or any other chicken with bones in it (4 thighs - 1 1/2 pounds)
  • Coconut milk - 150mL (a little over 1/2 cup)
  • Yellow curry powder - 1/4 cup
  • Curry paste - 1 tbsp
  • Basil
  • Rice
Cook the amount of rice you want according to instructions. Rip the skin off the chicken thighs with your best "Hulk smash" impression. Cut the meat parallel to the bone, set aside. Cut the meat around the bone perpendicular to it, but not through the bone. Take the bones with the meat still on it, put it in the pot on medium high. This is the braising process. If the meat begins to stick to the bottom, do not worry. It will detach with the addition of water, later.

MEANWHILE...
Wash, cut your potatoes, carrots, onions. With the onions, it is easiest to cut them into slivers, as shown below.

By this point, check on the chicken bones. They should be cooked enough to cut through. Take them out (carefully, hot) and cut them up. Put them back into the pot with the rest of the uncooked chicken meat. When it browns on the outside, add in all the vegetables, give it a stir. Once the vegetables begin to look coated with the fats and the onions begin to caramelize, add in all the spices, and it will look like a hot mess. Once the spices are absorbed, add about 4 cups of water, or enough to almost cover the vegetables. Let cook for about 40 on med-hi. Once the veggies get close to fork tender, give it a taste to see if any more spices are needed, turn down to low, then in goes the coconut milk. Give it a good stir.

Stand back and ponder Life, the Universe, and Everything. Turn off the heat and serve over rice.

Sunday, January 10, 2010

Breakfast Burrito Bonanza!

Every morning you run out the door and the last thing on your mind is stopping to make breakfast. Maybe you grab a bagel and stuff it in your mouth wishing for something with a little more flavor and perhaps a little healthier for you. Well I have the solution! The home made frozen breakfast burrito! You can put whatever strikes your fancy into these little guys. Just make sure your ingredients are dry or when you reheat your burrito it gets kinda soggy. You can make as many of these as you want at a time. I made a dozen of them this time and for that I used:

1 dozen eggs

12 burrito shells

1 pack lean turkey bacon

1 can black beans

Grated cheddar cheese

Salsa


Rinse and drain your beans well. Chop the bacon and cook well. Cook your eggs, but just before they really start firming up add in the turkey bacon and black beans and mix together. Cook your eggs all the way through (or burrito will be soggy!). Let the egg mixture cool all the way.

Now take your shells (I used whole wheat this time) and put a ½ cup of your egg mix in the middle, top with some salsa and cheese, fold up tight!

The important part to making these is really in how you freeze them. Place them on the freezer shelf, or on your cookie cooling rack, in a single layer with nothing covering them. Freeze them solid (takes maybe 2 hours). Then once they are solid you can store them in a big ziplock bag. When I need to take one with me I just take it out and put in a smaller ziplock in my lunchbox. Now to reheat wrap the burrito in paper towels and microwave for about 2 minutes. Tada! Insta-breakfast!

Crock-Potular success

So...
I received a Crock-Pot for Christmas (thanks Paul and Caterina!!!) and have been ITCHING to try it out. So I present to you a recipe (with a few small modifications) that I found on the Crock-Pot website.


Ingredients
1 teaspoon cayenne pepper (halved, as my man doesn't like spice)
1 tablespoon coarse salt
1/2 teaspoon freshly ground black pepper
1/4 teaspoon ground ginger
1 1/2 to 2 pounds beef brisket, scored with a knife on both sides
2 tablespoons olive oil
1/2 cup real maple syrup
1/4 cup Jack Daniel’s, or other whiskey
2 tablespoons brown sugar
1 tablespoon tomato paste
Juice of 1 orange (about 1/3 cup)
2 cloves garlic, smashed
4 slices orange peel, 1/2" x 1/2" (careful to avoid bitter white pith when peeling)

Step 1: Rub
Combine cayenne pepper, ginger, salt and black pepper. Rub all over brisket and place in a plastic bag inside of a bowl (to prevent drippage).


Step 2: Marinade
Mix up the rest of the ingredients except the orange peel and garlic. Add in the last two ingredients and pour into the bag. Seal up, and for the love of God, put it on the bottom shelf of the fridge. You do not want the icky meaty greasy stuff all over your fridge if it spills. Let it marinade for 2 hours or overnight. I pulled mine out about halfway through a 3-hour soak and gave it a little massage.


Step 3: Cook
Stick the whole mess in your slow cooker and cook on high for 3½-4 hours on high or 7-9 hours on low, turning once or twice. Take the briskety goodness out of the pot and let it rest for 5 minutes or so before you carve it up with some of the pan juices spooned on top.


Friday, January 8, 2010

Good noms reminisces about Soviet Russia

It snowed again in our not-so-wintry land of Mary, and Tu and I made soup. What sort of soup, you ask? Why the sort of soup I grew up eating as a wee lass. It's called borscht, or any number of alternate spellings, and can be (and has been) made vegetarian by omission of meat and substitution of vegetable broth/bouillon.

Ingredients:
  • MARROW BONES (I yelled it because this is the basis of delicious soup. If you don't want to eat meat in your soup but don't want to make it vegetarian, you must use bones. Trust me.)
  • Beets. 2 large or 3 small.
  • Potatoes. 3 medium.
  • Cabbage. 1/4 to 1/3 head, depending on size.
  • Onion. 1 whole.
  • Carrots. 2-3.
  • Meat (optional) (stew beef or chuck) 1/2 lb - cut into stew-pieces.
  • Olive oil for cooking.
  • Peppercorns.
  • Bay leaves. (3)
  • Salt/peppers.
Toppings/serving suggestion.
  • Sour cream.
  • Clove of garlic.
  • Really heavy and dark rye bread.
Bring a large pot of water with the bones in it to a boil (here you may notice I'm using my lovely Christmas LeCreuset, affectionately dubbed as LePot, 5 qt). Peel and halve the beets.

When the pot comes to a boil, you will see white foam come to the surface. Scoop it off. It is bad. It will make your soup taste bitter. Commit the look/consistency to memory, for the next time you decide to call someone a scumbag. After a few minutes (10-15) the scum production will slow down, add the beets. Chop up carrots and onions (I also like to leave the skins on on the carrots, not the onions though). Arrange in clever shape on your plate (optional).
When the beets are soft, take them out, add the potatoes that have been quartered (with skin on), meat, peppercorns and bay leaf. Sautee the onions and carrots in a bit of olive oil. You may season it with salt/pepper. Process the beets (basically shred them by hand or in food processor). Slice the cabbage really thin (think cole slaw/sauerkraut). Put all of above mentioned ingredients back into the pot. Turn to medium low, cover, do as you please for about a half hour.

This is important so pay attention. To serve - get out your fur hat (optional, but recommended). Pour hot soup into the bowl (add salt/pepper to taste), top with a dollop of sour cream. Eat with a clove of garlic, and a slice of dense, dark rye, taking alternating bites. Feel Russki.

Thursday, January 7, 2010

Winter Stew


While I was on holiday in the Northeast, I had my two and a half weeks of winter. Then I returned to Southern California where I walked around in my shirt sleeves after dark and thought about how happy I was to be back. But while I was East, I made a very wintery meal, which I will now share with you, to help you get through all those long, dark, cold days that you may or may not have ahead.

YOU WILL NEED:
4 white or yellow onions
6 or so fair sized red-skin potatoes
2 cloves of garlic
1 parsnip
1 turnip
1 yam
1 pound of carrots
1 large steak
Oregano, thyme, black pepper, tarragon and bay leaf to season.
Olive oil, to cook in.

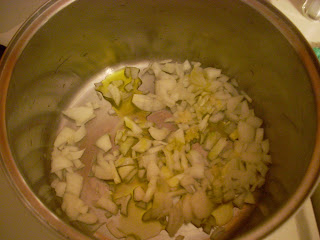
Begin by chopping your onions and pressing your garlic. In this case, I chose to use a garlic
press instead of just chopping it, because I wanted it to infuse into the broth that I was making.
Chop two of your onions into into small pieces. Set the other two aside. Press both cloves of
garlic. Fry these two things in olive oil in the bottom of a large soup pot.

Next, you will need to cut up your meat.
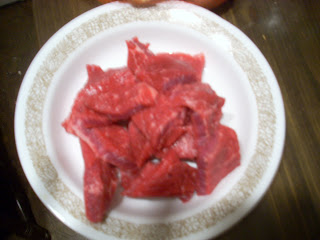
Once you have done this, add it, and more oil, to your pot.

Fry it until all the meat appears cooked.

Then add six to eight cups of water and a teaspoon of salt. You have magically created beef broth, free of all the extra crap and packaging usually associated with beef broth!

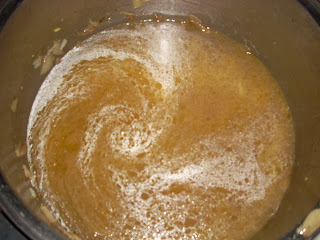
Let it come to a boil as you chop your vegetables.

You will need to peel and cut the turnip, parsnip and yam. All vegetables should be cut to about the size of a quartered, small potato. You should leave the skins on the potatoes and carrots.
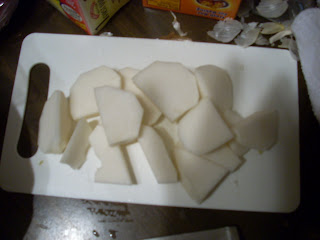
The skins add flavor and nutrients to your food. You might want to cut up your carrots into smaller, coin sized rings. That's what I do.

Add the veggies to the pot, and then season it well with Oregano, black pepper, two bay leaves, thyme and tarragon. Don't over do it, but don't under do it.
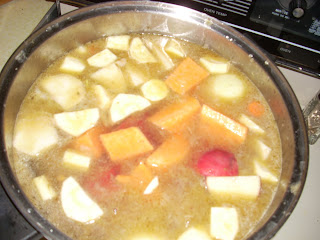
Then get it simmering and leave it there for a while, uncovered. With soups and stews, I have the following rule of thumb: if you want it to thicken, uncover it. If you want it to keep its moisture, cover it. Stews should thicken out.
Then go do something else for about an hour. I recommend Mario Kart Double Dash.
Once you've totally won against your siblings and become the queen of your household once again, or if you did something else, about an hour later, the soup will be ready. You should check it in between every couple of races... I mean, every fifteen minutes or so, to make sure
nothing is sticking or burning. If it is, reduce the heat.

When the soup is finished, the yam will have cooked into the broth and all the rest of the vegetables will be mushy and tender. The meat, in my case, was tender enough to cut with a
spoon.

Now, I like to eat garlic bread with stew, personally. Garlic bread is easy to make. Its very similar to the recipe for garlic bread stuffing, but here it is again, just in case:

You will need:
About a half a stick of butter
4 cloves of garlic
Oregano and basil, to season
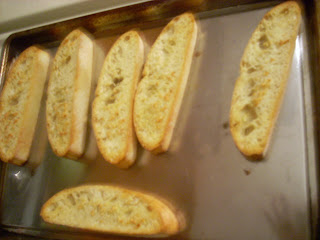
Thick bread, sliced.

Arrange the bread slices on a cookie sheet. Preheat the oven to about 375. Then melt the butter in the microwave so it is a liquid. Use a garlic press, or cut the garlic by hand into small pieces, and add all of it to the liquified butter. Season it. Stir it up.
If you have a little brush, you can brush it on the bread. If not, you can sort of pour it on with a spoon.
Bake for about five to ten minutes, keeping a weather eye, to make sure the bread gets to be your desired amount of crunchy without burning.

Dip the garlic bread in the soup. Mmmmmmm.